
D-i-Y TUNER BALUN
A SIMPLE, LOW COST HOME-BREW TUNER BALUN FOR UP TO 500 WATTS
From the previous page on TUNER BALUNS, we saw why a 4:1 balun of any type is the WRONG balun to use as a Tuner Balun. Indeed the 1:1 Guanella (Choke Balun) is the only correct way to address the task of transitioning from Openwire Feedline to an Unsymmetrical Antenna Matchbox.
BEWARE: MOST PEOPLE WORKING IN THE SHOPS WHO SELL BALUNS DO NOT UNDERSTAND WHY AND ARE STILL LIVING IN THE FALSE WORLD OF YESTERDAY WHERE PEOPLE BELIEVED THE 4:1 BALUN WAS THE BALUN OF CHOICE.
Besides, they will offer you a balun costing $80 to $150 and claim "this is what most people use." In one respect they are right. Most people are using the wrong balun, due to the bum advice they are receiving from the people who claim to be experts.
Do your self and your bank account a favor: home-brew your own balun!
Now on with the project:
A VERY SIMPLE AND EFFECTIVE TUNER BALUN:
That YOU can build for under $20 Parallel
Connection
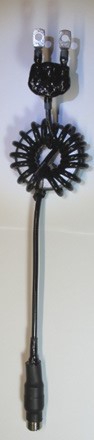
In this example, the terminals used are Terminals
6mm solder lugs spaced to fit standard
Wireman 450 Ohm Windowline.
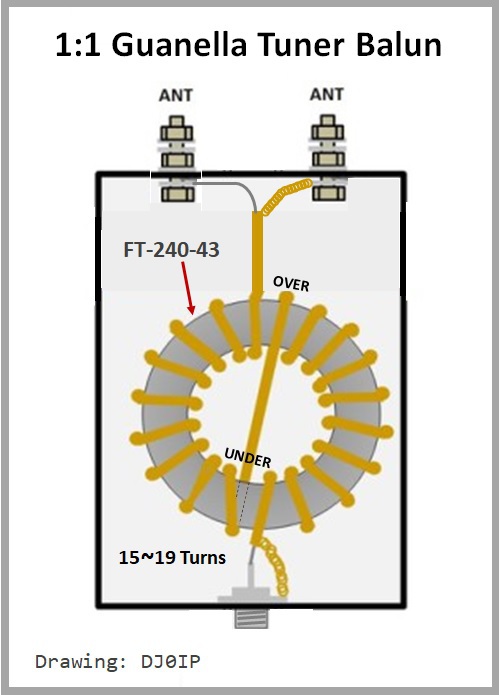
This simple 1:1 Guanella (Choke) Balun "X" Turns of a
is wound on an FT-240-xx ferrite core. Specific Coax
It consists of a specific number of turns on a Specific
of coax. More details below. Ferrite Toroid
The special winding Cross-Wound, or
Cross-Winding technique is called the
"Reisert Method", named after Joe Reisert,
W1JR, who first described this technque
of winding. (see bottom of this page)
In this picture the balun has a female UHF
(PL) connector because that's what this
particular application called for. If you Insulation is a
you would remove the heat-shrink tubing, combination
you'll find a normal PL-259 soldered to of heat-shrink
the coax. A standard PL-259 connector tubing and
and a double-female PL enables you to liquid electrical
connect to "whatever." tape.
It is perfectly OK to use this outdoors but then you should insulate the connection terminals with electrical tape or similar after connecting to the 450 openwire (windowline).
Purists may also want to coat the pre-wound toroid with several coats of liquid electrical tape, but that is not absolutely necessary.
APPLICATION SPECIFIC DETAILS:
Contrary to what most commercial balun vendors try to make us believe, there is no such thing as a "best" balun or "one-size-fits-all" balun.
- Which toroid size?
- Which Ferrite mix?
- Which size of wire or which type of coax?
- How many turns of wire or coax?
- Reisert cross-wind or classic wind?
With this many variables, how can there possibly be just ONE balun type that is best?
If that were true, there wouldn't be so many variables to work with and there would have been no need for Jerry Sevick to write his book on Baluns and Ununs.
Yet most salesmen trying to sell you a balun will try to make you believe there is a "best" that most people use. NONSENSE!
A GENERAL PURPOSE TUNER BALUN:
The selection of components for your tuner balun will depend on the required bands it must cover as well as the power level it must handle.
In a perfect world, we would have 3 different baluns, one for 160/80, one for 40/30 and one for 20-10m. We would swap them in and out as necessary.
In our real world, this is not a practical solution, so we seek the best compromise.
The tables below show recommended values. In some cases it shows more than one possibility. Again I remind you it is always a compromise when trying to cover multiple bands. Where there is a choice, the one solution will favor the lower band(s), the other solution will favor the higher band(s).
RECOMMENDATIONS:
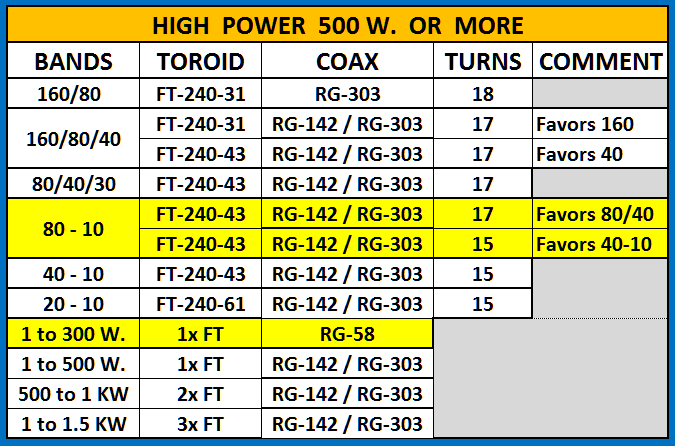
NOTE: The combinations marked with a yellow background are typical for what most people will use for their 80-10m tuner balun.
IMPORTANT:
The tables above assume your want your matchbox to be usable with "any kind" of openwire-fed antenna.
It seems to me that most people designing baluns make the assumption that most users will only use the matchbox with symmetrical antennas. They seem to forget that some users want to match openwire-fed OCFD antennas or vertical-dipoles with it.
These two antennas just mentioned can tend to have a lot of common mode current on them. The table above takes that into consideration and suggests toroids with enough permeability for the job.
If you are only matching a center-fed dipole or a full-wave loop and these are hung high and in the clear of surrounding objects, then you may wish to use toroid cores with less permeability - thus slightly less loss.
In that case, in the tables above, substitute as follows:
- Instead of #31, use #43
- Instead of #43, use #52
EXAMPLE: W1JR (Reisert) Cross-Winding Method
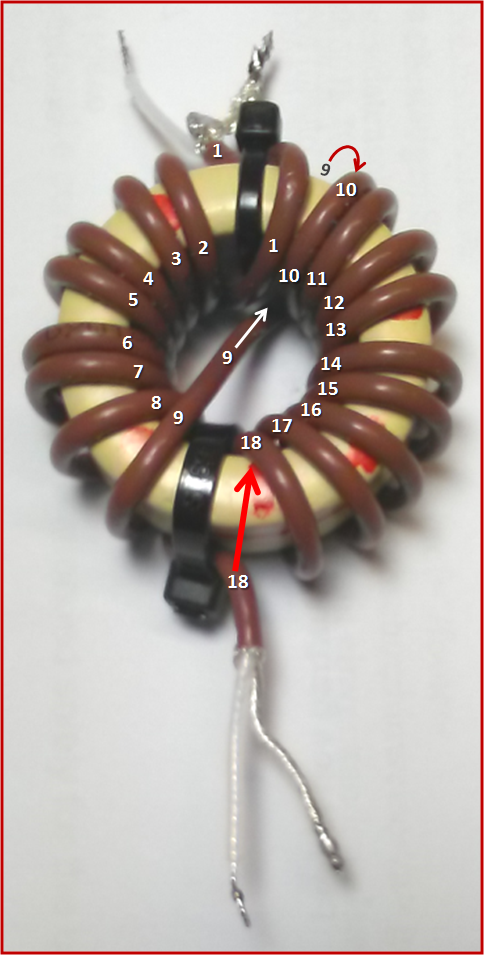
Cross-Winding using the Reisert (W1JR) Method:
With classical winding, both ends of coax end up sitting next to each other on the same side of the toroid. Often this is OK. Sometimes it is advantageous to have them at opposite sides of the toroid (i.e. one on top, the other on the bottom).
- Begin by secuing the coax cable very tight to the toroid with one or two wire ties, leaving a stub length long enough for the planned connection.
- You may wind towards the left or the right, it doesn't matter.
- Wind half of the turns on one side of the toroid.
- Once you have reached the middle of the side opposite from where you begin, bend the coax 180 degrees and run it back to its initial starting position, but slightly off center towards the free half of the toroid.
- When you reach to opposide side, take care that the cable passes the toroid on the opposite side than where it passed at the beginning of this curve. Sounds difficult. Please observe where turn 9 in the picture above moves across the toroid and becomes turn 10. It begins above the toroid and on the opposite side it runs under the toroid.
- Procede winding the other half of the turns onto the other half of the toroid.
- Once reaching the end of the free half of the toroid, you should have the number of turns you were attempting to wind onto the toroid.
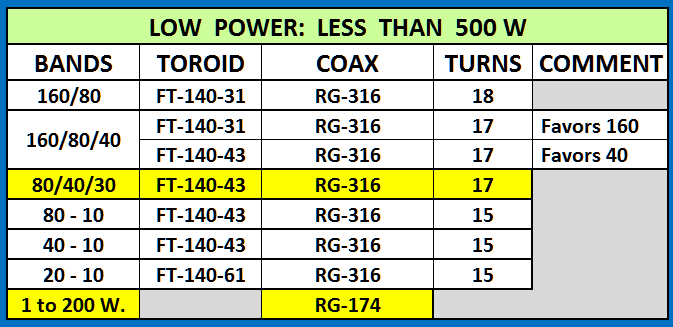
A SIMPLE TUNER BALUN
The drawing on the right shows a simple, but effective Tuner Balun that can be used between an unbalanced Antenna Tuner and Balanced Transmission Line.
If wound with RG-58, it is good for a couple hundred Watts. Use RG-142 coax (Teflon insulated) for higher power.
For up to 500 Wats, one Toroid is enough.
For 1kW, use a stack of 2 Toroids.
For 1.5kW, use a stackof 3 Toroids.
For 40m and above, 15 turns is enough.
For 80m and above, use 17 turns.
For 160m, try to get 19 turns onto the core. If you only manage to get 18 turns, then use it.
If you prefer, you may use Bifilar windings instead of coax, but I strongly recommend using Teflon-insulated wire. In theory this is slightly better, but in practice you won't notice a difference.

N E W

A Short Video by W8JI
N E W
OCFD ANTENNA
PRESENTATION


( Info-Only; NO SALES! )
Spiderbeam on Facebook:


BRAND NEW
from Spiderbeam:

Mini "SOTA" Pole
by Rob Sherwood NC0B

(AUF DEUTSCH)


Spiderbeam FG Pole

Photo: Nischal Nethrananda

A fun film about
Ham Radio Outdoors
(not just in Tenerife)
(English & German)

(nearly) Invisible Pole

An Aerial-51
Sponsored Expedition:
INTRODUCING
Special purpose Aerials:

Ultra-Lightweight antennas for expeditions and stealth applications.
+
(other)
---------------------
UPDATES:
|
|
-----------------
LL-TUNER "S-MATCH"
added to my
symmetrical tuner page.
----------------------
PROGRESSING:
LOTS OF NEW CONTENT IN THE SECTION:


Since JAN-2013
*******************