
3-Step Programming your Radio
DISCLAIMER
I am not the author of the software program that I recommend here, nor am I an expert in programming software. The software and procedure I describe here were used successfully to program several Baofeng and Wouxon Radios, but . . . USE AT YOUR OWN RISK!
CONNECTING THE RADIO TO THE COMPUTER
- Turn the Radio OFF.
- Make sure the cable is not plugged into the Computer.
- Open the plastic/rubber lid protecting the Radio's MIC and Headphone Jack.
- Plug the cable into the Radio.
- Plug the cable into the Computer and wait one minute for the cable to initialize and be recongnized by the Computer.
- Turn ON the Radio.
The Radio is now connected to the Computer.
PROGRAMMING THE RADIO
STEP-1: CREATING YOUR OWN CHANNEL FILE
BEFORE beginning, it is a good idea to print the Channel Chart you created in Step 1 (Preparation). You will soon enter this data into the software program's spreadsheet.
SHORTCUT: Instead of creating your own channel file, you may also use someone else's channel file. That way you do not have to enter all of the information yourself. If you live in Region One (Europe), you might use my file: HERE
CONTINUE CREATING YOUR OWN FILE:
START: RUN the CHIRP program.
When the program has begun, you will be confronted with a nearly blank page (as shown in the previous page under "Installing the Programming Software").
CONTINUE:
- Click "File" (top left)
- Click "New" in th drop-down menu
- A default file will open; it looks like this:
 DEFAULT "NEW" CSV FILE
Note: the first line, LOC[ation] "0" is not a saveable channel. The first channel we use will be channel 1. Initially channel 1 and all other channels show "0.000000" as the frequency.
To begin entering data:
- Click on the channel (Loc) number of the channel you wish to edit. Normally we start by clicking on "1". This highlights the entire row in blue.
- When the line is highlighted in blue, you can click on any parameter in that row and change its value. When you click on a parameter (except cells containing frequency values), a tiny down-arrow will be displyed on the right side of the cell. Click on that arrow to open the drop down menu, allowing you to change values. Note: Frequency must be entered in the same format as shown in line 0.
- The frequency shown in the first column is the simplex frequency, or the transmit frequency of a repeater (which is the receive frequency of your radio).
- You can assign a name to the channel in the second column. The name is optional. If you do not give it a name, it will be left blank.
- Unless you are working in an environment where you need some particular Tone Signal, leave the third column (Tone Mode) set to "(None)". In doing so, the next 4 columns do not need changing.
- The "Duplex" column is where you specify if this channel is to be a simplex channel or a repeater channel. If simplex, select "(None)"; if repeater, select either "+" or "-".
- In the Offset column, you can set the frequency offset between the RX and TX frequencies. There is no drop down menu for this column. simply enter the frequency. Here in Europe it is 600 kHz (represented by "0.600000") for 2m and 7.6 MHz (represented by 7.600000) for 70cm.
- Mode is normally set to "FM".
- "Tune Step" defaults to 5 kHz. I just left it at that because when working in Channel Mode, when you change a channel, the radio will QSY to whatever frequency is saved into the associated channel. As you tune through the channels it jumps to the channel frequency; it does not use VFO steps.
- I did not change any of the remaining columns.
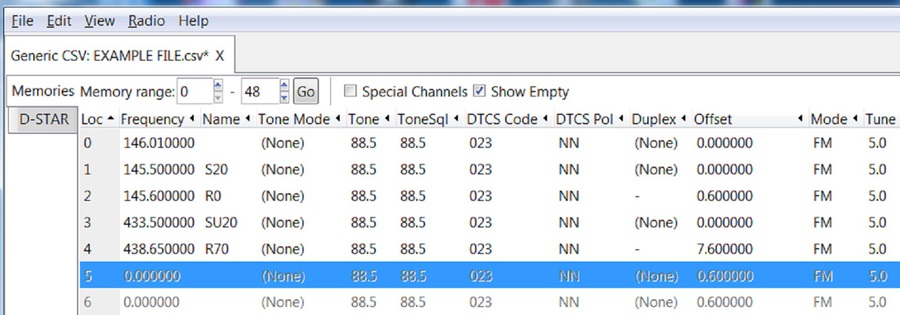
I will now create an EXAMPLE and show you what it looks like.
I am going to program as follows:
CH1: 145.500 (International Calling Frequency - Simplex Channel "S0")
CH2: 145.600 (European Repeater channel "R0")
CH3: 433.500 (International Calling Frequency - Simplex channel "SU20")
CH4: 438.650 (European Repeater channel "R70")
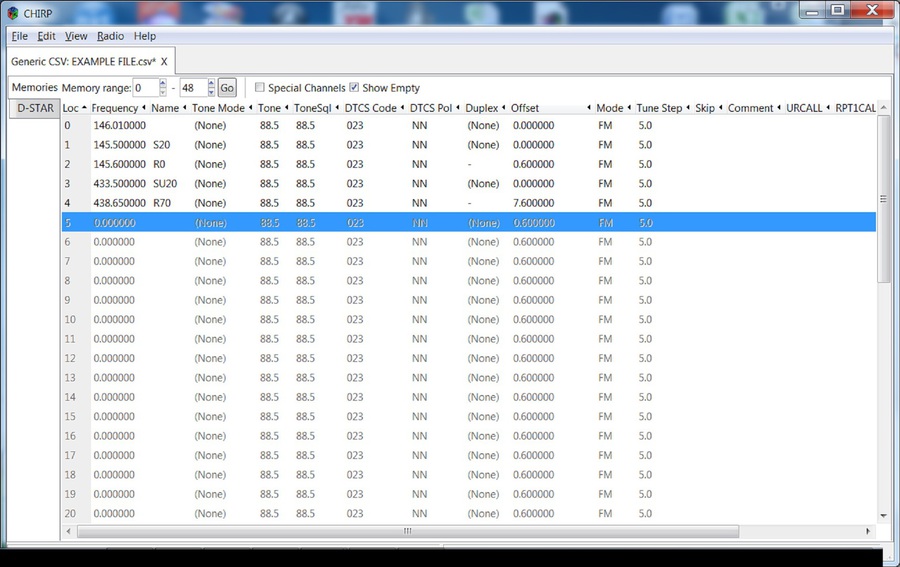
I will ZOOM-IN on the important data (for clarity):
VERY IMPORTANT:
Once you have entered a few channels, SAVE YOUR FILE!
- Click on "File" (top left)
- From the drop-down menu, Click "Save As" (only the first time you save it). This will allow you to choose a location to save to and give the file a name, such as "My Channels" - whatever.
ANOTHER GOOD IDEA: After entering a few more channels, save your work again. This time you only must click "File" and then "Save".
(No need to click "Save As"). The file saves instantly. That way if the computer crashes, you won't lose very much data. Save the file often as you edit it!
Note: By default the program only displays 25 channels. You may select any number of channels to display that you want. I wanted to enter 48 channels, so I changed it to display 48 channels. You can do that in the box that is displaying "48" above.
DOUBLE CHECK YOUR WORK: For some reasons I found that some values were sometimes changing. Often the "-" in one or more of the offset cells disapeared. I had to re-enter them.
When you have entered all of the channels that you wish to store right now, you should save your work one last time...(again click File, then Save).
EDITING: There are several editing features. If you click a channel number to highlight the row, then right click anywhere in the horizontal blue bar, a new drop-down menu will open, displaying several options. This will enable you to insert channels above or below the channel you have highlighted. This is good in case you forgot one or need to add one later.
AFTER you have saved your work, close the file by clicking the "X" on the right of the tiny box containing the file name (uper left corner). Once again you will have nearly a blank page.
* * * * * * * * * *
SIMPLER ALTERNATIVE:
Instead of entering your data directly into the programming spreadsheet, try entering it into the CSV file (using Excel).
- After you have created your new file above, enter one simplex channel into Channel Location 1 and enter one repeater channel into Channel Location 5. Include the offset (plus or minus) and the offset frequency (-600 kHz or -7.600 MHz).
- Save the file (saves as a .csv file).
- Minimize the window of the programming software.
- Open the .csv file with Excel.
- Using Excel, now proceed to copy in the simplex channels and and repeaters with the help of copy/paste.
- EXAMPLE: You want to enter 20 repeater channels, each with 12.5 kHz step frequency difference.
- Click on channel loc 5 to highlight the entire line.
- Copy the entire line.
- Paste it into the next 29 lines below that.
- The frequency of the first channel you entered (ch 5) will be located in cell location C7.
- Click once on cell C8 to highlight it.
- Now enter the formula "=C7+0.0125000"
- This will enter the frequency stored in cell C7, plus 12.5 kHz.
- Then copy the contents of C8 into C9, C10 etc., down to C27
- This increments the frequency of each successive channel by 12.5 kHz.
As you see, it is possible to enter the frequency for 20 or 30 or 50 repeaters within a minute or so, as long as you enter them sequentially in equal frequency steps.
When finished, SAVE youy file.
* * * * * * * * * *
- - - - - - - - - - - - - - - - - - - - - - - - - - - - - - - - - - - - - - - - - - - - - - - - - - - - - - - - - - - -
STEP-2: IMPORTING "YOUR" CHANNEL DATA TO THE PROGRAM:
Your channel data is currently stored in a CSV file. You cannot upload CSV data. You first have to import the CSV file, but . . .
BEFORE you can import the CSV file such that it is converted to an uploadable file, you first have to download the Radio's exsting channels.
DOWNLOAD FROM RADIO:
- Click on "Radio" in the menu in the top left corner of the window.
- In the drop-down menu that opens, click on "Download From Radio" .
- This opens a familiar small window which you have seen before. It shows you the selected COM Port and the Make (Vendor) and Model of your Radio. Check that the data is correct. If not, select the correct data.
- Click on "OK" to proceed.
- Again you get the window with the warning that the radio's driver is experimental and asking you if you wish to proceed. Click on "Yes". (If you click no, the process will terminate).
- The final window before the download begins is giving you instructions for connecting the radio. It is probably already connected. If not, follow these instructions; then click "OK".
- The cloning process begins, displaying a green progress bar in the center of the tiny window. When the process completes, the window closes.
This opens a full screen window, displaying the current channel contents of the radio.
You will see the name of the file in the upper left corner.
In my case it was "Baofeng UV-51: (Untitled)*".
The next process will overwrite this data with the channel data that you have previusly stored in a CSV file. (I hope you remember the file name and it's location - hi).
NOW is a good time to back up this current data
if you have not previously done so.
After it has been overwritten by your personal channel data,
this data will be lost forever.
OVERWRITING CURRENT CHANNEL DATA WITH PERSONAL DATA:
- Click on "File" in the top left corner of the windos.
- In the drop-down menu that opens, click on "Import".
- This opens a smaller window in which you can browse to your own personal channel file.
- Browse to the folder containing your personal channel file.
- You will not see your file yet, but don't worry.
- In the lower right corner of this window you will find the "File Type Box" (It currently displays "CHIRP Files (*.chirp)". There is also a tiny down-arrow on the write. Click the arrow.
- Select "CSV Files" (*.csv).
- NOW you will see your personal CSV file listed above in this window.
- Click once on your file. The file name highlights.
- Its filename is also displayed in the white box below (left). Click "Open".
- This opens a small window entitled "Import From File" and shows some of the data. Click "OK".
- This now overwrites the current channel of your radio that is displayed in the programming window with your own personal channel data. CHECK IT AND MAKE SURE IT IS
CORRECT.
- If you seem to be missing some channels, don't worry, read the next bullet below.
- NOTE: If you have entered more than 25 channels of data, you will have to change the number of channels to be displayed (upper left menu) by clicking the up-arrow several times, and then clicking on "Go" (next to the arrow).
- AT THIS POINT,
- YOUR CHANNEL DATA IS ONLY WRITTEN TO THE PROGRAMING WINDOW,
- IT IS NOT YET UPLOADED TO THE RADIO.
- - - - - - - - - - - - - - - - - - - - - - - - - - - - - - - - - - - - - - - - - - - - - - - - - - - - - - - - - - - -
STEP-3: UPLOAD "YOUR" CHANNEL DATA TO THE RADIO:
At this point:
- You should have already completed steps 1 and 2.
- (BE SURE YOU HAVE SAVED YOUR FILE !!!)
- The CHIRP program is still running.
- The radio is already switched on and connected to the computer.
- Your own personal channel file (CSV file) has been imported, and is displaying in the programming AND is NOT a .CSV file.
- You are ready to upload your selected channels to the radio.
If not, then go back and repeat Step-2.
- Now you are at the point where you are ready to upload your own file.
CONTINUE:
- Click "Radio" in the menu in the upper left of the window
- Click "Upload To Radio"
- Again the tiny window appears displaying the COM Port number and the correct Radio
- Click "OK"
- Again you are warned of the experimental driver; at the bottom right, Click "Yes"
- Again the instructions appear showing how to properly connect the radio, but your radio is already connected, so just Click "OK".
- The tiny Cloning window appears showing the progress of the upload.
- When it has finished uploading, the window disapears.
- Now turn off your radio.
- Remove the cable from the computer.
- Finally, remove the cable from the radio.
CONGRATULATIONS: YOU ARE FINISHED PROGRAMMING YOUR RADIO.
When you turn on your radio now and go into Channel Mode, you should fine the channels that you have programmed into your radio. Check to be sure they are all there and entered correctly.
-----
END

N E W

A Short Video by W8JI
N E W
OCFD ANTENNA
PRESENTATION


( Info-Only; NO SALES! )
Spiderbeam on Facebook:


BRAND NEW
from Spiderbeam:

Mini "SOTA" Pole
by Rob Sherwood NC0B

(AUF DEUTSCH)


Spiderbeam FG Pole

Photo: Nischal Nethrananda

A fun film about
Ham Radio Outdoors
(not just in Tenerife)
(English & German)


(nearly) Invisible Pole

An Aerial-51
Sponsored Expedition:
INTRODUCING
Special purpose Aerials:

Ultra-Lightweight antennas for expeditions and stealth applications.
+
(other)
---------------------
UPDATES:
|
|
-----------------
LL-TUNER "S-MATCH"
added to my
symmetrical tuner page.
----------------------
PROGRESSING:
LOTS OF NEW CONTENT IN THE SECTION:


Since JAN-2013
*******************