
Aluminium Mast Guying Info
(Guying instructions downloads are at the bottom.)
1) Guy Plate Sets
2) Guy Rope
3) Guy Rope Lengths
4) Attaching Guy Ropes
5) Guying Instructions
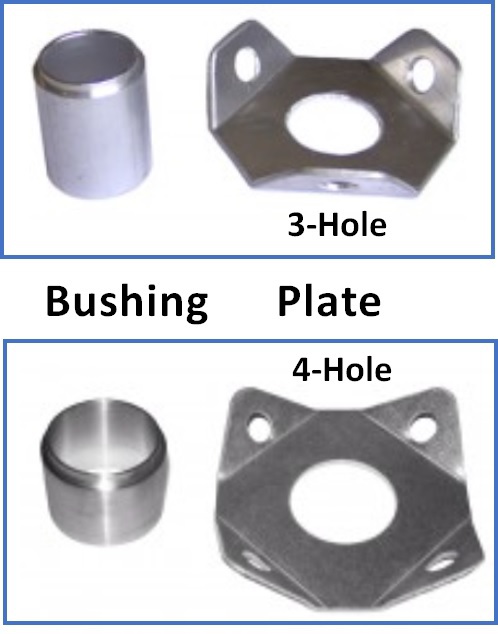
1) Guy Plate Sets
There are two types of Guy Plate Sets:
3-Hole and 4-Hole.
- Most Ham Radio installations seem to prefer the 3-Hole version, probably for cost-reasons.
- However most commercial installations opt for the 4-hole version, which is more reliable in high-wind applications.
Tip: if your QTH is prone to high winds, especially together with heavy snow or icing, use the 4-Hole version. It costs a little more (more rope), but is much more reliable.
The plates are shown upside-down (for clarity). They mount with the rings pointing DOWN.
Note: These Guy Plate Sets enable rotating the entire mast with Spiderbeam Yagi antenna from the bottom, which is the preferred rotation solution.
More Info: H E R E
2) GUY ROPE
Spiderbeam offers two kinds of rope for guying its HF Yagi antennas:
- 6mm Polyester Rope (excellent for portable/temporary installations)
- 4mm Dyneema Rope (preferred for permanent installations)
For permanent installations, clearly the Dyneema rope is preferable.
It's fundamental advantage over Polyester rope is that it does not stretch.
Stretching is very dangerous because loose guy ropes is one of the major causes of damage in storms. A properly guyed antenna is far less likely to be damaged than one with loose guy ropes.
Polyester is cheaper and definitely strong enough for the job. It is often preferable (for cost reasons) in portable and expedition operations. During these field day like operations, someone is near the antenna every day and can see when the lines have stretched and need a little tensioning.
Dyneema costs about 50% more than Polyester, but saving on this point, especially for permanent installations is, in my opinion, saving in the wrong place. In the end it may result in far more expense and aggravation.

3) GUY ROPE LENGTHS:
The table on the right shows two sets of lengths for guy ropes.
- Recommended (70% of height)
- Minimum (60% of height)
You can increase the distance to the guy stake for even more strength but there is no point in placing the guy stake farther out than the height of the highest guy point.
The Spiderbeam mast models are shown across the top with a yellow background.
The distance to the ground stake is also shown with a yellow background.
The lengths shown for each individual guy rope is the actual distance between the guy plate and the guy stake (in Meters). In practice you need to cut each rope 2m (6.6 ft.) longer than the length shown.
Lengths are shown for 3-direction and 4-direction guying.
At the bottom of each chart you see how many rolls of 6mm Polyester or 4mm Dyneema rope are required for each mast.
Since the table is a bit difficult to read online, I will include a downloadable version below.
4) Attaching Guy Ropes
Note: the edges of the guy plates are sharp and over time, will cut the rope.
ALWAYS use a rope thimble or a carabiner between the guy rope and the guy plate.
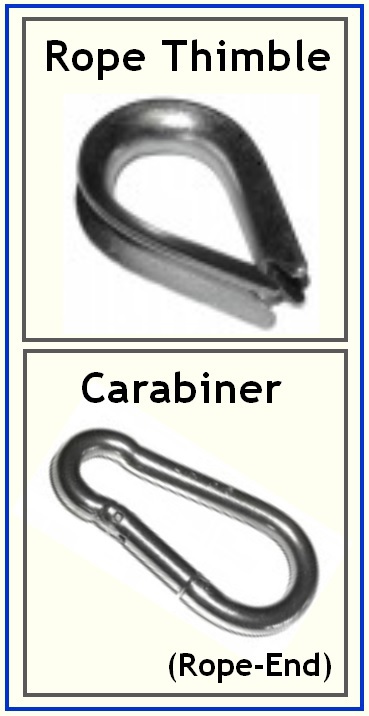
Rope Thimble:
The rope thimble is excellent for protecting the rope from the sharp edges of the guy plate, but is more suitable for permanent installations.
The best way to fasten the ropt to the thimble is by using Rope Clamps. However, we have been simply tying knots in the rope for a dozen years now and I am unaware of any failure due to using this method.
Carabiner:
This is a better solution for portable installations because it can be attached or unattached quickly to the Guy Plate.
Purists will also use a Rope Thimble together with the Carabiner, but we simply attach the rope to the Carabiner by tying a knot. The best knot is the Sheet-Bend.

Rope Clamp:
Rope Clamps come in many different sizes. You must choose the correct size for the rope you are using (i.e., 4mm, 6mm, etc.).
Note: The 3mm Rope Clamps shown on the Spiderbeam web page are not suitable for use with the two types of guy rope that Spiderbeam sells. It is for use with the 3mm Steel-Guy-rope, used in several commercial applications.
As stated above, we usually just use a Carabiner and tie the rope to the it using hte Sheet-Bend knot.
4) Guying Instructions for Spiderbeam Aluminum Masts
Downloads
Lengths are show in METERS for each of the Spiderbeam mast models.
Guy Rope Lengths of Masts.pdf
PDF-Dokument [68.6 KB]
Instructions for guying the Spiderbeam 15m Aluminium Mast.
Guying Instructions for 10m ALU Mast.pdf
PDF-Dokument [135.9 KB]
Instructions for guying the Spiderbeam 10m Heavy Duty Aluminium Mast.
Guying Instructions for 10m HD ALU Mast.[...]
PDF-Dokument [909.2 KB]
Instructions for guying the Spiderbeam 12.5m Heavy Duty Aluminium Mast.
Guying Instructions for 12.5m ALU Mast.p[...]
PDF-Dokument [129.7 KB]
Instructions for guying the Spiderbeam 14.5m Heavy Duty Aluminium Mast.
Guying Instructions for 14.5m HD ALU Mas[...]
PDF-Dokument [151.2 KB]
Instructions for guying the Spiderbeam 15m Aluminium Mast.
Guying Instructions for 15m ALU Mast.pdf
PDF-Dokument [156.3 KB]
Instructions for guying the Spiderbeam 18m Heavy Duty Aluminium Mast.
Guying Instructions for 18m ALU Mast.pdf
PDF-Dokument [181.1 KB]

N E W

A Short Video by W8JI
N E W
OCFD ANTENNA
PRESENTATION


( Info-Only; NO SALES! )
Spiderbeam on Facebook:


BRAND NEW
from Spiderbeam:

Mini "SOTA" Pole
by Rob Sherwood NC0B

(AUF DEUTSCH)


Spiderbeam FG Pole

Photo: Nischal Nethrananda

A fun film about
Ham Radio Outdoors
(not just in Tenerife)
(English & German)


(nearly) Invisible Pole

An Aerial-51
Sponsored Expedition:
INTRODUCING
Special purpose Aerials:

Ultra-Lightweight antennas for expeditions and stealth applications.
+
(other)
---------------------
UPDATES:
|
|
-----------------
LL-TUNER "S-MATCH"
added to my
symmetrical tuner page.
----------------------
PROGRESSING:
LOTS OF NEW CONTENT IN THE SECTION:


Since JAN-2013
*******************