
Mounting a Dipole on a Spiderpole
IS IT OK TO MOUNT A DIPOLE ON THESE SPIDERPOLES?
OF COURSE IT IS OK - IF AND ONLY IF
YOU FOLLOW SIMPLE INSTRUCTIONS
The information on this page will help you understand how to safely install a dipole onto a Spiderbeam telescoping fiberglass pole.
YES, I should have taken Art Classes in school and learned how to draw!
LOOKING AT THE DRAWING ABOVE, there are a number of details we will address which all influence the viability of safely deploying this antenna and keeping it up without breakage.
I will address the following topics:
- ADVANTAGES OF USING FIBGERGLASS POLES
- DO NOT's and DO's
- Choice of Antenna Material
- Guying
- Procedure for Safely Erecting the Antenna
ADVANTAGES OF USING FIBERGLASS POLES:
- Low cost way of putting wires high into the sky
- Additional height of antenna can mean much better performance
- Much lighter than aluminum or steel masts
- One person can erect the mast and antenna by him-/herself
- Non-metallic mast means no interaction with the antenna
- In the event it might fall in a storm, the lightweight mast does not do much damage to surrounding objects
DO NOT's
- DO NOT DRILL ANY HOLES IN THE POLE - PERIOD!
- DO NOT USE HEAVY COAX (RG-2013 OR LMR-400) WITH THIS ANTENNA
- DO NOT USE HEAVY BALUNS WITH THIS ANTENNA
- DO NOT USE HEAVY WIRE
- DO NOT USE HEAVY ROPE TO GUY THE WIRE
- DO NOT ASSEMBLE THIS ANTENNA ON THE GROUND AND TRY TO PIVOT IT UP
ALL of the above can lead to breakage of the pole. We have seen this often.
Antennas such as a Carolina Windom are much too heavy for use with lightweight fiberglass poles and are No-No's unless you drop the feepoint far down the pole.
CAUTION: Drilling holes anywhere into the pole weakens it significantly and usually leads to breakage. DO NOT DRILL ANY HOLES INTO THE POLE.
DO's
- DO USE THIN COAX (RG-58, LMR-240, AIRCELL5, RG-174), or lightweight Window-Line (i.e., WIREMAN) TO RUN UP THE POLE.
- Spiral the transmission line around the pole about one turn per meter. This spreads the load of the line equally around the pole, keeping it straight.
- DO USE LIGHTWEIGHT BALUNS. CONSIDER USING AN OPEN-FRAME BALUN
- DO USE THIN WIRE. AWG-26 IS THICK ENOUGH FOR HIGH BANDS AND AWG-18 IS THICK ENOUGH FOR THE LOW BANDS. USING THICKER WIRE BRINGS ONLY A TINY FRACTION OF A dB MORE, BUT CAN BREAK YOUR ANTENNA.
- USE A LIGHTWEIGHT, THIN, STRONG ROPE SUCH AS 2mm KEVLAR OR DYNEEMA TO SUPPORT THE ENDS OF THE WIRES. EVEN PVDF MAY BE USED.
- TO ERECT THE POLE, STAND THE COLLAPSED MAST UPRIGHT, PULL OUT ENOUGH POLE SEGMENTS TO REACH TO POINT WHERE THE FEEDPOINT WILL ATTACH, ATTACH ANTENNA, AND THEN TELESCOPE THE POLE UPWARDS, ONE SEGMENT AT A TIME.
- SPIRAL THE COAX AROUND THE POLE AS YOUR RAISE IT, SUCH THAT IT HAS ABOUT ONE TURN PER SEGMENT (ea. 3 ft.).
CHOICE OF ANTENNA MATERIAL
WIRE:
The ARRL Handbook and just about every other antenna book has always recommended using 12-AWG or 14-AWG wire for antennas. THIS IS BAD ADVICE for a modern antenna to be used with a lightweight telescoping fiberglass pole.
Thick wire is heavy wire. Since it attaches near the top of the pole, where the pole is very thin, it produces a force on the pole which can lead to premature breakage.
By using 18-AWG wire, or even thinner, we do add an additional resistive loss, but it is a fraction of a dB. In return we have a lightweight antenna that can be raised much higher in the air. Raising the antenna just a few meters (i.e. 10 ft.) higher into the air can sometimes gain us an S-Unit or two. This is 6 or even 10 dB more, compared to the fraction of a dB we lost by using thin wire.
COAX:
We have been taught to always use good quality coax, and rightly so. In the past, good quality in coax meant using much thicker coax (i.e. using RG-213 instead of RG-58).
In the meantime, new material used in modern coax has enabled coax the size of RG-58 to have as little loss and as much power handling capability (or at least legal limit for hams) as RG-213.
Modern coax includes LMR-240, AIRCELL5, and even RG8U or RG8X (but the good stuff, not the cheap Rat-Shack stuff).
You need only run the thin coax from the feedpoint, down the pole. Once it gets to the ground, you can extend it with any kind of coax you like.
INSULATORS:
I really like the looks of old fashion porcelain insulators. Unfortunately these are taboo for dipoles to be used with fiberglass poles.
Modern insulators are made of Polyethylen, Fiberglass, Plexiglas or Epoxy (FR4). These are available commercially but also very easy (and cheap) to fabricate yourself. I mostly use home-brew insulators. I purchase large sheets of Epoxy board (FR4) and saw them into little pieces.
ROPE:
The choice of rope is VERY important. Thick rope can weigh much to much for use extending the legs of the antenna to the next tree. Choosing the wrong rope material can also be disasterous. Many types of rope material will soak up water in the rain, which can double their weight.
Use material like Kevlar or Dyneema rope. Or use PVDF Monofil. If Kevlar, be sure to use one that has a protective cover (i.e. thin Dacron), because Kevlar itself is not UV-resistant.
For portable use, thin nylon "twine" is good enough for supporting the ends of the dipole and even for guying the pole. Just don't use it for permanent use because it is not UV-resistand and will also break when covered with ice.
Pulley:
If possible, do NOT use a pulley. It adds unnecessary weight and the rope used with it also adds unnecessary weight. Worse yet, all of this weight is to one side of the pole, placing an unnecessary strain on one side of the pole.
Even when using the optional clamp set, one person can raise and lower the 12m fg pole within a few minutes. Pulleys with ropes are only necessary on masts that cannot be raised and lowered easily.
Simply attach the antenna to the collapsed pole, then shove it up, one segment at a time. You will have the antenna into the air in a few moments. If you need to work on it (i.e. shorten or lengthen it to find resonance), simply lower the pole a few segments until you can reach the ends of the wires.
BALUN:
"Baluns" are highly controversial by themselves. You will find lots of information on baluns on my web site, as well as links to several balun gurus' work.
On the one hand we would like our balun to be as large as possible in order to minimize losses. On the other hand, big also means heavy and weight is counterproductive when installing on a fiberglass pole.
The trick is to find the right size and use the right material.
In the United States, most baluns sold seem to come in big bulky enclosures and are rated for ridiculously high power levels (i.e. 5kW, etc.). Often the balun (alone) used in dipole antennas and Windom antennas sold in the States are heavier than some of the dipole antennas (including coax) sold here in Europe.
If you know you will only run 100w, and you know you want to maximize performance by maximizing height, choose your balun wisely.
CONSIDER OPEN-FRAME BALUNS
An open-frame balun is a balun without any enclosure at all. Often the 1:1 balun is only coax wrapped around a Ferrite Toroid. The coax is waterproof and the toroid is almost waterproof. Simply spraying or painting with "Plasti-Dip" is sufficient to fully insulate it from the weather and adds ZERO weight.
Some examples of Open Frame Baluns are shown HERE.
ON THAT PAGE, please take a close look at the balun on the very bottom, "B9". This was the original prototype of the balun used in Spiderbeam's Aerial-51 Model 404-UL OCFD antenna. It weighs just 80 grams (3 oz.).
IMPORTANT: It is very important that a balun be designed with large enough ferrite for the job. Otherwise it will fail to block common mode current and the CMC flowing through it will heat it and possibly destroy it.
On-the-Otherhand: It does not need to be 5x larger than necessary to be good!
KEEP IN MIND: We are trying to design and optimize an entire antenna system here, not just an individual component. The goal is to create a high performing antenna system by keeping the antenna and feedline light enough to be erected high into the air on a lightweight fiberglass pole.
GUYING
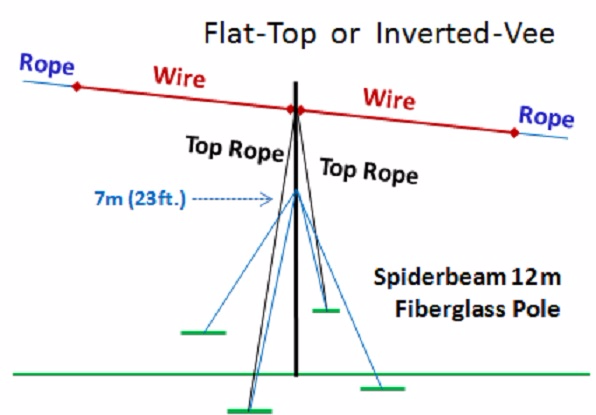
For short periods on days without wind, the 12m fg pole can be used without guying. However it is normally better to guy it as foreseen in the Spiderbeam guying instructions at the 7m (23 ft.) level.
Theoretically, poles may be guyed in just 3 directions, however if you do not pay close attention and assure that the guy points are exactly separated by 120 degrees, it may lead to damage in storms. The safest way is to guy in 4 directions (90 degrees apart). In this case, it doesn't matter if one of the guys is not exactly 90 degrees from the other.
For more on guying, see Guy Ropes.
When you attach a dipole above the guy level, sometimes you can get buy without adding additional guys but most of the time the top of the pole will lean to one side or the other. Again, for short periods of time (up to one or two days), this won't hurt, but for longer periods of time it may warp the pole.
In such cases it is better to add top guy ropes. See the drawing below.
BEST GUYING:
Here we see two top rope guys that are perpindicular to the plane of the wires.
These can be fastened at the same level as the feedpoint or one segment below it.
Be sure to use thin guy rope or string, and not heavy rope.
It makes no difference if the antenna is erected as a flat top or an Inverted-Vee, this is how you keep the pole straight and prevent warping.

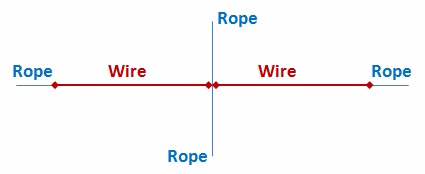
ALTERNATIVE:
You can also bend the legs of the dipole (or Inv.-V) both in the same direction, to one side and then use just a single rope guy to keep the pole straight. Again guy at the level of the feedpoint or one meter below and use thin rope or string.
SAFELY ERECTING THE POLE:
FIRST: FOLLOW ALL STANDARD SAFETY RULES FOR STAYING CLEAR OF POWER LINES.
The NUMBER 1 cause of pole breakage when erecting the pole is installing the antenna and coax on the ground with the pole fully extended, and then pivoting it upright. The pole was not intended to be used like that. DO NOT DO IT. It stands a very good chance of breaking if you erect it like this. (NOTE: we are speaking about a dipole and coax here; a thin wire used as a wire vertical does not have much weight. If that is all you have on the pole, then you can pivot it up.)
As stated above, simply attach the antenna to the collapsed pole and then push it up, one segment at a time. Coax should be spiraled gently around the pole, about one turn per meter (per 3 ft.).
Follow standard GUYING INSTRUCTIONS for your pole.
The Spiderbeam 12m pole described here is very light weight. Usually one person alone has no problem man-handling it. ALL LONGER SPIDERBEAM POLES are too heavy for one person to easily man-handle. They may be erected by one person alone but should be first fastened to some kind of support for the base. Guying is not optional for poles 18m and longer, IT IS A MUST!
As an example, see: BASE SUPPORT

N E W

A Short Video by W8JI
N E W
OCFD ANTENNA
PRESENTATION


( Info-Only; NO SALES! )
Spiderbeam on Facebook:


BRAND NEW
from Spiderbeam:

Mini "SOTA" Pole
by Rob Sherwood NC0B

(AUF DEUTSCH)


Spiderbeam FG Pole

Photo: Nischal Nethrananda

A fun film about
Ham Radio Outdoors
(not just in Tenerife)
(English & German)

(nearly) Invisible Pole

An Aerial-51
Sponsored Expedition:
INTRODUCING
Special purpose Aerials:

Ultra-Lightweight antennas for expeditions and stealth applications.
+
(other)
---------------------
UPDATES:
|
|
-----------------
LL-TUNER "S-MATCH"
added to my
symmetrical tuner page.
----------------------
PROGRESSING:
LOTS OF NEW CONTENT IN THE SECTION:


Since JAN-2013
*******************