
CLAMP SETS for Spiderpoles
1. What is a Clamp Set?
2. When do you need to use Clamps?
3. Where does each Clamp Mount?
4. Clamp Set Assembly Instructions. (DOWNLOADS)
5. Installing the clamps onto the pole.
6. What if no heat gun is available?
7. Tips for easier installation of clamps.
1. WHAT IS A CLAMP SET?
A Clamp Set is a set of stainless steel hose clamps, prepared especially for use with a specific Spiderpole. The 18m and 26m Spiderpoles include a clamp set and the clamp sets MUST BE USED all the time with these poles. The clamp set is optional on the 12m pole, but we strongly recommend using it with this pole too.
Each Clamp Set contains N-1 clamps, where N = the number of segments of the pole. There are 11 clamps in the Clamp Set for the 12m and 18m poles, 12 clamps for in the set for the 22m pole and 14 clamps in the Clamp Set for the 26m pole.

The picture on the left shows an assembled Clamp Set for the 12m Spiderpole.
TIP: Number each clamp with the number of the segment that it mounts on. Use a white "Eding Marker" or "Sharpie Marker" with permanent ink.
All segments have clamps except for the very bottom one (seg. number 1), so numbering begins with "2". Use a marker with white PERMANENT ink, such as a Sharpie or Edingstift.
Each assembled clamp consists of 3 components, as shown in the center picture: A stainless steel clamp, a short rubber strip, and a short piece of heat-shrink tubing for encapsulating the clamp and rubber strip.
When assembled, the clamp will look like the pricture on the right.

2. WHEN DO YOU NEED TO USE CLAMPS?
- 26m Pole: ALWAYS (ABSOLUTELY NECESSARY)
- 22m Pole: ALWAYS (ABSOLUTELY NECESSARY)
- 18M Pole: ALWAYS (ABSOLUTELY NECESSARY)
- 12m Pole: USUALLY (DEPENDS on application*)
- 10m Pole: Currently no clamp set available
- 7m Pole: Currently no clamp set available
- 4m Pole: Currently no clamp set available
*If the application is simply a thin vertical wire running up the pole, then for short term use for a few hours, the clamps are not necessary. On the other hand, if the application is as a support for the center (balun) of a dipole, with coax running down the pole, you do need the clamps. YOU MUST ALWAYS USE THE CLAMPS WHEN USING THE 12M POLE WITH THE QUAD SET.
The clamps keep the individual segments from sliding back down inside the segments below them.
Although the friction lock functions very good, during temperature swings from warm to cooler temperatures, the poles contract and the segments can collapse. By placing a clamp just above the junction of each pair of segments, you can avoid the pole collapsing.
TAPE INSTEAD OF A CLAMP ?
Many people do this, but it is not a good idea unless it is for very short term use. If you leave tape on the joints for a longer period of time, there are two possible problems that may incur:
1. When removing the tape, it removes part of the protective ` layer of paint on the surface of the fiberglass.
2. It leaves a very sticky residue that is hard to remove. When retracting the pole, it runs down inside of the segment below it , and then prevents the segments from sliding easily in and out of each other.
By mild weather (not too hot), it is OK to use for short term (i.e., day outings).
"ONLY EXCEPTION":
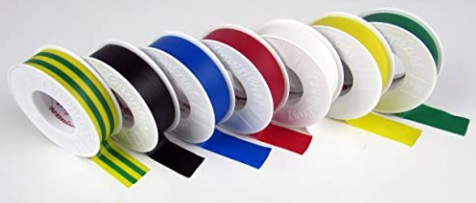
"Coroplast" Tape
A special tape made of Polyvinlchlorid, (PVC), that is self-adhiesive, and does not use any glue.
I purchased it on Amazon.
Each roll is 15mm (⅗ in.) wide and 10m (33 ft.) long.
LINK: Coroplast Tape
I have also seen it listed on ebay.
This is only recommended FOR TEMPORARY USE.
For PERMANENT USE, you should use the Spiderbeam Clamp Set.
3. WHERE DOES EACH CLAMP MOUNT?
.

The clamps always mount
at the bottom of their associated segments.
There is a clamp for ALL pole segments, except the very bottom segment.
The clamp always mounts at the bottom of the smaller (upper) segment of each joint. It rests on top of the lower segment. It's purpose is to prevent slipping of the upper segment into the lower segment.
IT DOES NOT SQUEEZE THE POLE SEGMENTS TOGETHER!
CAUTION: Over-tightening
of the clamp may damage the pole segment.
It only needs to be snug (slightly tight). DO NOT OVER-TIGHTEN!
TIP:
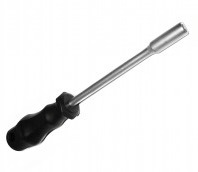
DO NOT USE A SCREW DRIVER for tightening the screws on the clamps set!
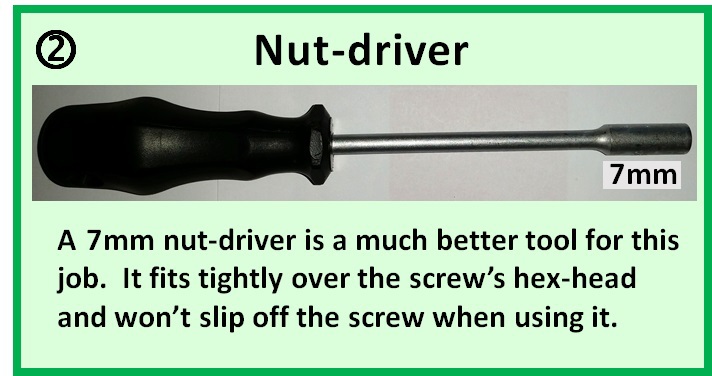
If you look closely to the screw, you will see that it has a hex head.
US A 7mm NUT DRIVER to tighten the screws.
Spiderbeam sells nut drivers for this purpose, but any 7mm nut with nut driver or ratchet will work.
or . . .
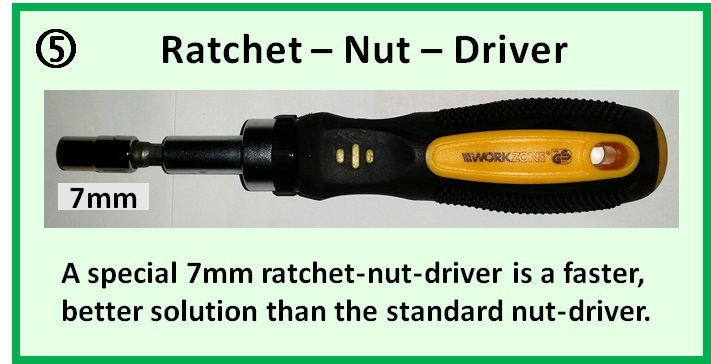
Use a Ratchet-Wrench:

I bought this 7mm Ratchet-Wrench on ebay for just a couple of bucks. I covered the long body of the wrench with heat-shrink tubing to prevent it from slipping in sweaty hands when working during the hot summer months. With this wrench, it takes just a few seconds to tighten or loosen the clamps.
4. CLAMP SET ASSEMBLY INSTRUCTIONS
[DOWNLOADS]
5. INSTALLING THE CLAMPS ONTO THE POLE
AFTER securing the collapsed pole to its support (or with a second person holding the pole steady), install the clamps as follows:
EXAMPLE: 12m (40') Spiderpole:
- Remove the rubber top cap from the pole.
- Pull the center (thinnest) segment up about 30cm (1 ft.) and TEMPORARILY tape it fixed at this height using electrical tape.
- Slide clamp #2 over the top of the pole and allow it to slide down until it is resting on the remaining segments.
- Next, slide clamp #3 over the top of the pole and push it down until it's resting on clamp #2.
- (If not using a Spiderbeam Guy Belt):
- Then slide clamps number 4, 5, 6, 7, 8, 9, 10, 11, & 12 (in that order) over the top of the pole.
- (If using a Guy Belt):
- This slide clamps number 4,5,6, 7 & 8 over the top of the pole.
- Now slide the Guy Belt over the top of the pole.
- Then slide clamps number 9, 10, 11, and 12 over the top of the pole.
- Note: for other Spiderpole models (i.e., 18m, 22m, 26m), please read:
- Guy Belts to see where to place the guy belts.
- While holding the top of segment #12 with one hand, remove the tape securing it to segment #11. Do not let go of segment #12 (if you do, it will slide inside of the other segments and all of the clamps will fall off).
- Now pull segment #12 all the way out until it won't extend any farther, and secure the friction lock.
- FRICTION LOCKS are activated by pulling two adjacent segments apart and at the same time, twisting them in opposite directins.
- Slide clamp #12 into its prober position (see picture 3. above) and secure using a 7mm nut driver or screw driver. CAUTION: DO NOT OVER-TIGHTEN! Tighten until the clamp is snug and slightly tight, but not super-tight
- Now extend segment #11 upwards as far as it can go and tighten the friction lock.
- Slide clamp #11 into its proper position (see picture in 3 above) and secure using a 7mm nut driver or screw driver. CAUTION: DO NOT OVER-TIGHTEN!
- Continue with segment #10 and clamp #10.
- Then segment #9 and clamp #9 . . . etc., until all 12 segments of the mast are fully extended and the clamps are all in place and secured.
This completes the mounting of the clamps to the pole.
6. WHAT IF YOU DON'T HAVE A HEAT GUN?
IMO, if you work with antennas, you MUST have a heat gun because heat-shrink tubing is an important component of good antenna installations. A small heat gun costing about $15 will suffice for the job.
BUT IF YOU DON'T HAVE A HEAT GUN AND DON'T CARE TO BUY ONE:
- Prepare all of the clamps as per the Spiderbeam instructions
- Pour about one liter (or one quart) of water into a small pan and place it on the stove.
- Heat until the water boils, then reduce the heat and allow it to keep boiling gently.
- Using a pair of pliers or tongs, insert the clamps, ONE AT A TIME, into the pan of boiling water.
- Leave the clamp long enough in the water until the heat-shrink tubing has completely shrunken.
- Remove USING THE PLIERS and set somewhere to dry. CAREFUL IT IS VERY HOT.
- Now repeat with the next clamp; then the next; until finished.
7. Tips for Easy Installation of Clamps
We often hear complaints about the clamps being difficult to install or remove.
Having used these poles and clamps for many years, I fully disagree.
If you find it difficult, you are not using correct method:
- You are using the wrong tool. Do not use a screwdriver.
- You have no numbered the individual clamps.
If you label each clamp as described in #1 above, and use one of the following tools, shown in photos 1 through 6, especially the battery powered tool, you should not have any issues with using these clamps. Do not use a screwdriver.
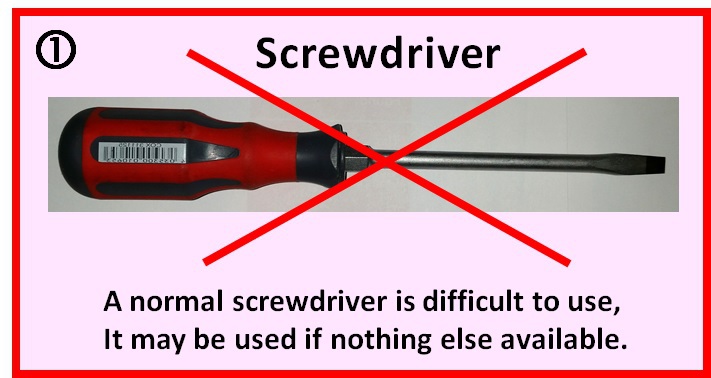


Screwdriver: of course you can use a screwdrive when nothing else is available, but it is the worst of all of the tools for this job.

N E W

A Short Video by W8JI
N E W
OCFD ANTENNA
PRESENTATION


( Info-Only; NO SALES! )
Spiderbeam on Facebook:


BRAND NEW
from Spiderbeam:

Mini "SOTA" Pole
by Rob Sherwood NC0B

(AUF DEUTSCH)


Spiderbeam FG Pole

Photo: Nischal Nethrananda

A fun film about
Ham Radio Outdoors
(not just in Tenerife)
(English & German)


(nearly) Invisible Pole

An Aerial-51
Sponsored Expedition:
INTRODUCING
Special purpose Aerials:

Ultra-Lightweight antennas for expeditions and stealth applications.
+
(other)
---------------------
UPDATES:
|
|
-----------------
LL-TUNER "S-MATCH"
added to my
symmetrical tuner page.
----------------------
PROGRESSING:
LOTS OF NEW CONTENT IN THE SECTION:


Since JAN-2013
*******************