
GUY BELTS (for Spiderpoles)

Guy Belts are heavy duty cloth belts designed specifically for guying fiberglass poles without asserting excessive point-pressure on the pole at the guy point.
Each Spiderpole has its own Guy Belt Set, so be sure to order the correct guy belt set.
The guy belts are not interchangeable; that is, you should not use a 12m pole's guy belt on an 18m pole, becasue it will sit in the wrong position.
Installing the Guy Belt(s)
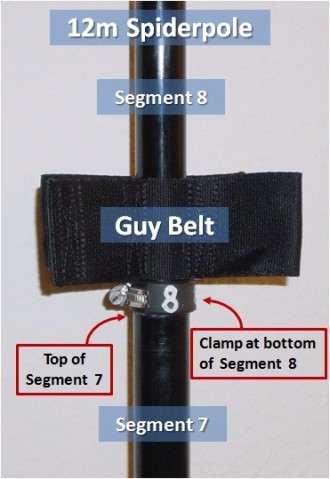
EXAMPLE: 12m Pole
Each Guy Belt must be mounted at its specific location. See "Guy Belt Positins" (below) for the exact positions of the guy belt(s) of each pole.
Guy belts ALWAYS mount at the bottom of their associated segment, resting just above the Clamp at the bottom of that segment.
The clamp serves a dual purpose. It prevents the upper segment from slipping down inside of the lower segment, and it also prevents the guy belt from slipping farther down the pole.
NOTE: When installing the 12m pole, secure the base (bottom segment) of the pole to whatever you have chosen to mount it to (e.g., fence post, tree, wooden stake, or angle iron). Remove the top rubber cap and pull the center segment part way out. Then slip the clamps for segments 2, 3, 4, 5, 6, 7, and 8 over the top of the pole. Next, slip the guy belt over the top of the pole. Then slip segments 9, 10, 11, and 12 over the top of the pole. Raise the center section as far as you can, twist and lock it into position. Position clamp #12 at the bottom of segment #12, resting on the top of segment #11, and tighten it. do not over-tighten. It only needs to be snug. Use a similar procedure for the 18 and 26m poles.
Guy Belt Positions
Always mount the guy belts as described below:
12m HD Spiderpole:
- Guy Belt: at the bottom of segment 8, just above segment 7 - (approx. 7m height)
12m XHD Spiderpole:
- Top Guy Belt: at the bottom of segment 10, just above segment 9 - (approx. 9m height)
- Bottom Guy Belt: at the bottom of segment 6, just above segment 5 - (approx. 5m height)
14m HD Spiderpole:
- Top Guy Belt: at the bottom of segment 10, just above segment 9 - (approx. 9m height)
- Bottom Guy Belt: at the bottom of segment 6, just above segment 5 - (approx. 5m height)
18m Spiderpole:
- Top Guy Belt: at the bottom of segment 9, just above segment 8 - (approx. 13m height)
- Bottom Guy Belt: at the bottom of segment 5, just above segment 4 - (approx. 9m height)
22m Spiderpole:
- Top Guy Belt: at
- Middle Guy Belt: at
- Bottom Guy Belt: at
26m Spiderpole:
- Top Guy Belt: at the bottom of segment 12, just above segment 11 - (approx. 19m height)
- Middle Guy Belt: at the bottom of segment 8, just above segment 7 - (approx. 12m height)
- Bottom Guy Belt: at the bottom of segment 5, just above segment 4 - (approx. 7m height)
NO GUY BELTS AVAILABLE !!!
Now what do I do?
In case you find yourself in a situation where you need to guy a
fiberglass Spiderpole, but do not have the guy belts available,
DO NOT TIE THE 2mm KEVLAR GUY ROPE DIRECTLY TO THE POLE!
The point pressure due to attaching thin Kevlar rope directly
to the pole can cause breakage of the pole at the tie-point.
The solution is to use short, thick, soft rope stubs
and tie the Kevlar guy rope to the rope stubs.
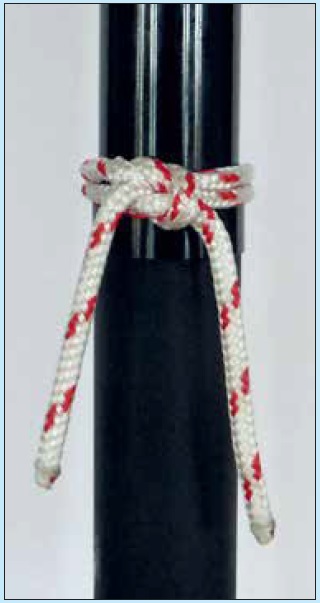
Using SOFT Rope Stubs:
Although these soft rope stubs do not spread the point-pressure as well as the original guy belts, they are MUCH safer to use than simply tying the 2mm Kevlar guy rope directly to the fiberglass pole.
The photo on the right shows a 6mm (1/4 in.) polyester rope stub tied to the pole with a square knot.
- Cut two pieces of thick soft rope, 50 to 70cm (20 to 28 in.) long.
- Fasten one of the rope stubs to the pole as shown in the picture. Wrap around the pole twice and fasten with a square knot.
- Fasten the second rope stub in the same way, just above the first rope stub.
- You now have 4 rope stubs hanging down.
- Fasten the four 2mm Kevlar guy ropes to these rope stubs, securing with a sheet-bend knot.
The standard guy belts must be attached at pre-defined positions. You cannot relocate them to other positioons. Sometimes it is necessary to guy at a position other than the standard guy point. This Rope-Stub method may be used instead of the guy belt.

N E W

A Short Video by W8JI
N E W
OCFD ANTENNA
PRESENTATION


( Info-Only; NO SALES! )
Spiderbeam on Facebook:


BRAND NEW
from Spiderbeam:

Mini "SOTA" Pole
by Rob Sherwood NC0B

(AUF DEUTSCH)


Spiderbeam FG Pole

Photo: Nischal Nethrananda

A fun film about
Ham Radio Outdoors
(not just in Tenerife)
(English & German)


(nearly) Invisible Pole

An Aerial-51
Sponsored Expedition:
INTRODUCING
Special purpose Aerials:

Ultra-Lightweight antennas for expeditions and stealth applications.
+
(other)
---------------------
UPDATES:
|
|
-----------------
LL-TUNER "S-MATCH"
added to my
symmetrical tuner page.
----------------------
PROGRESSING:
LOTS OF NEW CONTENT IN THE SECTION:


Since JAN-2013
*******************