
Tips for Working with Mini-Poles
The two Spiderbeam Mini-Poles have several thin segments near the top. Mounting the feedpoint (balun) of a dipole is slightly different since there is no clamp between the pole segments.
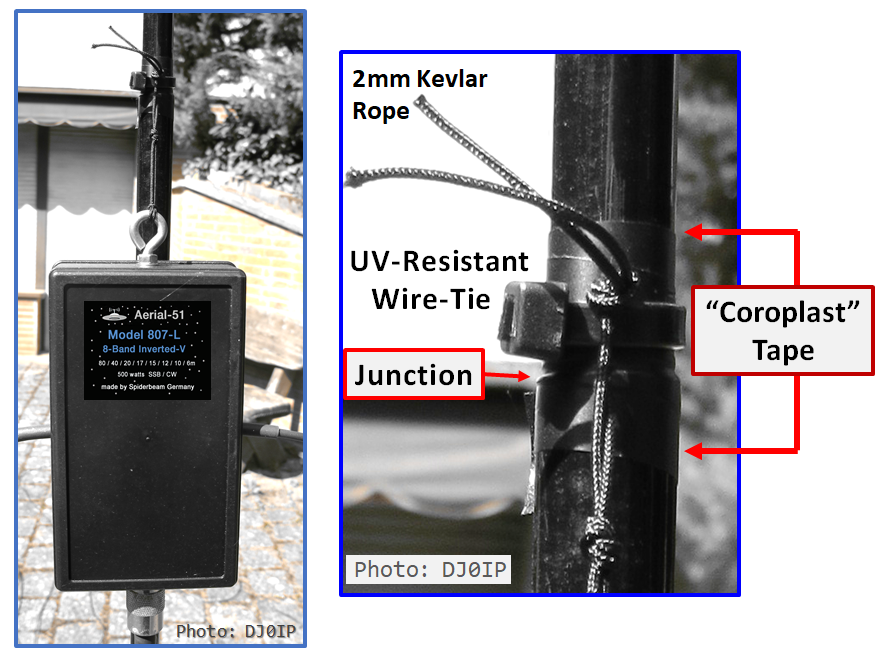
The following shows one way to easily attach the feedpoint of antennas such as Spiderbeam's Aerial-51 Models 404-UL or 807-L.
[Note: The Model 807-HD is too heavy for use with these Mini-Spiderpoles]

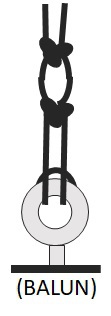
STEP ONE: Prepare the Attachment Rope
Spiderbeam's 2mm Kevlar Guy Rope is excellent for this, but its 1mm Kevelar Guy Rope may also be used.
Both are strong enough.
- Prpare a long loop as shown in 1A. Don't forget to prepare the ends of the loop (see: ).
- Tie two knots in the rope as shown in 1B.
The loop will later be inserted in the eyelet of the balun's mounting screw.
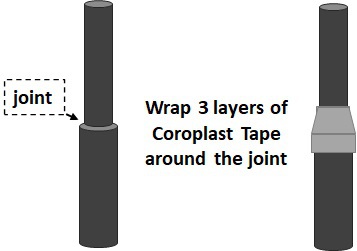
STEP TWO: Prepare the Pole
- Locate the junction (joint) of the two pole segments where the antenna feedpoint is to be attached.
- Wrap 3 layers of "Coroplast Tape" above the joint.
- Wrap 3 layers of Coroplast Tape below the joint.
- Then wrap tape over the joint of both tubes.
Note: "Coroplast Tape" is a very special, pressure-sensitive tape which does not use glue to stick to the surface to which it is applied. It uses self-adhesion. It does not leave a sticky, gooie residue when removed, like electrical tape or duct tape does.
STEP THREE: Attach Rope-Loop to Balun
- Insert the loop through the eyelet of the balun
- Insert the open end of the rope loop through the loop passing through the eyelet.
- Pull tight.
When finished, it should look like the drawing on the right ------------------------->
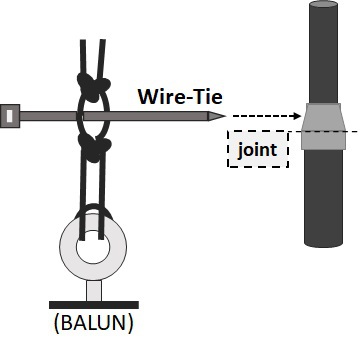
STEP FOUR: Attach Balun to Pole
- Insert a small wire-tie thrugh the loop.
- Wrap the wire-tie around the upper pole, just above the joint of the two segments.
- Pull tight. Pulling tight compresses the tape slightly. The wire-tie cannot slip down the pole.
See photo (below) for what it looks like.
INTERESTING FIELD TEST
The plan was to erect the 10m Mini Pole with the 807-L mounted to it, leave it up for a few days, then take it down again.
When I put it up, it was 24 degrees Celcius (75 F).
Two days later it snowed. Then it rained or snowed for 5 more weeks.
During that time the temperature was droping as low as -5C at night and sometimes as high as 10C during the day.
The pole with 807-L antenna stayed up the entire time.
When it finally warmed up (20 C), I took the pole and antenna down.
During the 5 weeks that the antenna was up, the pole never collapsed, despite the fact that I did not use any tapes or clamps on the junctions between pole segments. However, I did tighten the friction locks as tight as I possibly could.
When taking it down, I was wearing my very thin leather gloves, which assures a non-slip grip on the pole. The friction locks between some of the segments did not want to loosen; so I used the procedure as described HERE.
However, while using that procedure, I left the pole in place, loosly strapped to the wheel-mount, raised it slightly, then pushed it downwards hard. The friction locks broke lose first attempt, every time.
IMO, for a typical day-outing, you won't need any clamps and tape is only necessary at the junction where you attach the antenna.

N E W

A Short Video by W8JI
N E W
OCFD ANTENNA
PRESENTATION


( Info-Only; NO SALES! )
Spiderbeam on Facebook:


BRAND NEW
from Spiderbeam:

Mini "SOTA" Pole
by Rob Sherwood NC0B

(AUF DEUTSCH)


Spiderbeam FG Pole

Photo: Nischal Nethrananda

A fun film about
Ham Radio Outdoors
(not just in Tenerife)
(English & German)

(nearly) Invisible Pole

An Aerial-51
Sponsored Expedition:
INTRODUCING
Special purpose Aerials:

Ultra-Lightweight antennas for expeditions and stealth applications.
+
(other)
---------------------
UPDATES:
|
|
-----------------
LL-TUNER "S-MATCH"
added to my
symmetrical tuner page.
----------------------
PROGRESSING:
LOTS OF NEW CONTENT IN THE SECTION:


Since JAN-2013
*******************